
Enter the world of 3D PRINTING for Star Wars board games. Starfighters Italia has an 80 € voucher for you!
Board games and wargames are a wide and varied entertainment genre. For fans they represent a vehicle for the expression of their passions, pushing them to invest not only in game components, but also in unique customizations for their armies and battles with special models, unique scenic elements, custom accessories and many other types of gadget.
Additive manufacturing (the “technical” name of 3D printing) helps us on this front, making accessories and customized pieces easier to make and accessible for everyone. Nowadays it is no longer essential to be professionals in the sector to obtain decent results: a little practical sense is enough and in our case a printer that can materialize our projects!
After experimenting a bit with a small filament printer that I often use for work, I decided to take “the step” – inspired by Stefano “Hornet” Magi, veteran X-Wing player who has been printing his own accessories and ships for years. custom and Sebastiano Santaniello – ace of the Star Boars.
The customizations that you have only imagined so far can suddenly become reality with a “desktop” 3D printer to keep at home. The possibilities become endless! Did you lose a model that completes your Rebel Alliance warrior unit? You can probably find a printable template online and get it back in 30 minutes without purchasing a new expansion! Do you want to enrich your Imperial Assault games with detailed scenery? Don’t worry: after a few hours in the forge of your printer you can have a beautiful table!
Videoreview
We shot this video to show you the potential of 3D printing. After watching it, continue reading the rest of the article to discover all the features of the Geeetech A20, download our already optimized print profiles and discover the offer reserved for pilots and captains of Starfighters Italia! The video is in italian, but we have some handy automatic captions, courtesy of youtube.
A little disclaimer to get started
I don’t claim to be a 3D printing “guru”. There are much more credible sources on the subject – my goal is solely to share with you my experience with a 3D printer, and how this has supported my hobby and my collection of Star Wars board games.
My printer
After a bit of research and trying different models thanks to the availability of friends much more experienced than me (thanks Simone and Daniele!) I decided to orient myself on an entry level printer, with a medium-large print plate but which above all allowed to use the cheapest material in circulation, namely polylactic acid, more commonly known as PLA. In the end, the choice fell on the Geeetech A20, a single printhead machine produced by one of the emerging brands in the sector, which is rapidly growing in the wake already traced by the precursors Ultimaker, Prusa and more recently Creality.
After an afternoon of budgeting and researching online stores, I bought an A20, which arrived within 48 hours thanks to Amazon Prime. Yes I know. I am an impatient child. Read the article all the way and you will see that it was worth it!
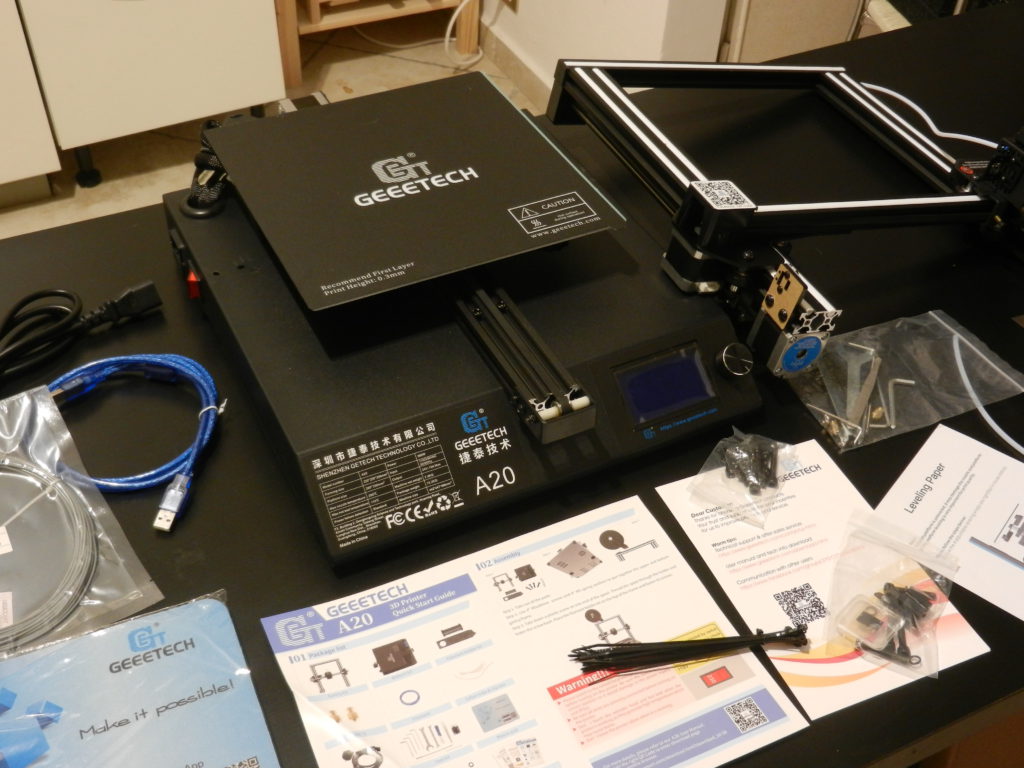
Geeetech A20

The Geeetech A20 is a simple machine to assemble, use and ESPECIALLY to maintain, since it is one of those inspired by the PRUSA i3 and incorporates its form factor. For the uninitiated, the Prusa i3 is a 3d printer whose open source project has been distributed on the internet, so that it was available to the “tinker” community for the optimization, industrialization and mass production of printers and accessories!
For the sake of clarity, the A20 that you will see in the video review and in this article is absolutely STOCK – no changes compared to what was contained in the box that arrived at home. Then, you will see results “out of the box”, with no changes whatsoever on the mechanics, electronics or assemblies of the printer. The profiles I used are the “standard” ones from CURA – free slicing software. You can find them at the bottom of the article!
The Geeetech A20 has an aluminum upper frame mounted on a sheet metal base. The print volume is 255 mm x 255 mm x 255 mm, more than enough to print our miniatures, scenic elements (possibly sectioning them into 2 or more pieces if necessary) and accessories for Star Wars board games.
At the end of this article you will find some photos of the prints I recently made with this printer, using 1.75mm PLA as the print material.
Packaging

Let’s talk about the practicalities: Geeetech’s packaging work is excellent. Geeetech used a nice sturdy foam that protects the upper and lower assemblies of the printer, there were no missing parts or damaged components (not even scratches due to transport) at the time of inspection. So, go easy on the expedition.
Assembly
Assembling the A20 frame is really simple: four screws to tighten at the base of the printer. TOTAL TIME: A FEW MINUTES, INCLUDING FINDING THE SCREWDRIVER!
You can see the assembly process in the video review: they are simple operations that only require a little forethought. The assembly of the frame is extremely easy, the 4 screws to be screwed with Allen key have the seats already prepared. In this regard, I recommend that you use one of the packaging foam panels to lay the printer on its side and make the operation much easier. Once the frame is assembled, install the filament spool holder. Check that you have properly tightened the screws provided, and that all components of the main frame are “level” (ie perpendicular). A tip: also check that the tension of the belts is optimal, simply checking that they are elastic and not “dangling” from the frame. The rest of the printer assembly is quite simple and following the brief instructions included in the box will take you about 15-20 minutes. In general, the included instructions are clear, the only part to pay particular attention to is the connection of the wiring: compare the images in the instructions with the various cables. Don’t worry, they are all labeled and easily distinguishable. Furthermore, the practical sheaths applied to the various bundles of cables make it practically impossible to get the connection wrong.

Once the wiring has been carried out, it will be sufficient to remove the protective film from the print bed, apply (very carefully!) The adhesive PEI print bed and then focus on the most satisfactory part.
Insert the filament into the extruder, load the included MicroSD card and finally remove the film from the printer screen!

The printer has an excellent workmanship – in my opinion – unlike others I have tried in the past (in particular, the Monoprice Mini Delta that I already have at home, purchased last year): all the electronics are hidden and protected in the base, and I really liked that the cables are neatly sorted. I had some doubts at the beginning about the choice of using SINGLE bearing sliding carriages, but honestly I have not yet encountered problems in the prints made so far. If I really had to give you some advice about it: get a good lubricant (eg mineral oil for gears / weapons), a drop will not hurt him after the first few hours of printing, or in any case at regular intervals to keep all the components in motion. very good condition.
Make sure the voltage selector is on 230V and turn on the printer for the first time. Still following the instructions, disable the motors and run the print bed leveling wizard. I suggest making at least 2-3 turns of the “corners” with the appropriate function: your plan will be perfect for the first test print. Open the print menu and … launch the gcode file included by default in the card: it will be your “test” print to see if you have assembled the printer well.

In the case of the A20, you’ll end up with a nice little plastic dog. We called it COSMO and placed it to watch over my collection of painted ships.

Geeetech A20 specs
Ok, before jumping headlong into printing an entire game table, let’s see the features of the printer on the fly. I dedicate this paragraph to fans of numbers who like me go crazy on product comparison sites before buying them.
- Printing Technology: Filament Deposit
- Print volume: 255 * 255 * 255 mm³
- Filament diameter: 1.75mm
- Nozzle diameter supplied in the package: 0.4 mm
- Compatible with the following types of material: ABS / PLA / wood polymer / PVA / HIPS / PETG
- Maximum printing plate temperature: 100 ℃
- Maximum extruder temperature: 250 ℃ (consider that PLA usually prints between 175 ° and 210 ° C)
- Power Supply: Input: 110V / 220V; Output: DC 24V / 15A
- Connectivity: USB cable, SD card (supports standalone printing)
- Display screen: LCD
- Printing Platform: aluminum heated bed + PEI flexible bed, adhesive
- Stepper motors: 1.8 ° step angle with 1/16 micro-step
- Overall dimensions of the assembled printer: 442 x 447 x 480 mm
- Package size: 510 x 495 x 295mm
- Net weight of the machine: 7.8 kg
Advanced functions
The “thread out sensor” and “print resume” functions are quite handy. When making rather long prints, seeing 10-15h of printing of a scenic piece nullified due to the finished spool is annoying, and the filament run out sensor allows you to be ready with a new spool to insert by pausing the print!
N.B. BEWARE OF VIBRATIONS! when switching the filament the printer is very delicate, prevent the first new layer from moving from the one below, being very careful NOT to hit the axes or the print head. The resume print instead saved me during a blackout – I was printing while both the washing machine and the oven were on … not optimal!
To be clear: I haven’t “intentionally” used it, except on an occasion or two to try out some pretty tough print profiles for thumbnails, but it’s very, very useful.
Leveling the print bed
One of the longest-standing problems with these printers is usually leveling the build plate, but with the A20 I didn’t have any problems. Performed as described above leveling with the sheet of paper method (just to be careful), I got consistently good printing results. In this regard, the cooling element (fan housing) is quite effective! It is able to cool the filament on a regular basis, limiting the phenomenon of “warping” (vertical bending of the prints due to the retraction of the material) on larger prints.
How do you prepare a model for printing?
Switching from the three-dimensional model to a physical object in your hands is quite simple. First, you will have to download the three-dimensional model from one of the many portals available. I point out www.thingiverse.com and www.myminifactory.com which have a lot of free templates. Plus, tons of cool artists are selling tons of awesome miniatures and models on patreon and gumroad!
Take a tour of their markets and you will see a lot of alternative models for your games.
Once you have the desired 3D model, it will be sufficient to open the slicing software of your choice – I always use CURA, quite intuitive and free. After making the initial settings for printer model and material, load the 3D model and select the desired print profile. In addition to the default ones, you will have the possibility to create your own and adjust all their values.
After adjusting the parameters as you wish, press “SLICE” and save the file on a MicroSD card which you will then insert into the machine. Start the printer, select the file and…. wait for it to finish printing!
For more details on printer settings for scene and miniature printing, I highly recommend watching this video series by 3D Printed Tabletop.
Ok, all very nice. But how does it print?


After some tinkering with the profiles of the 3D model slicing software (essential step to do) I was able to start a print and without problems go back to check the printer from time to time. I’ll be honest, the reliability of the printer surprised me positively. The PEI print base (flexible plastic with a strong 3M brand adhesive underneath) held up well with the prints, showing some deformation at the base only for the larger models.
For the more experienced: I advise you to always use a RAFT of at least 5-6 mm on larger prints, in order to further improve adhesion and avoid tedious deformation at the edges. Maybe, you could consider installing a silicon carbide glass print bed – it will ensure excellent adhesion of the prints. If you want to save some money, you can even ask a glassmaker to cut a mirror to size and sand it lightly!
For example, what you see in the picture is a rather large model of the RAZOR CREST, the ship of the Mandalorian. You can find it for free on Thingiverse. The model is large in size and took about 9 hours, using a “very slow and very accurate” profile dedicated to miniatures. As a result, it contracted and lost some adhesion on the far edges. By adjusting the head movement settings and optimizing the slicing profile I started with, I was very happy with the print results. If I really had to suggest a modification, if you want to dedicate yourself to printing miniatures (eg for Legion) I would suggest you switch to a 0.2 mm nozzle and replace the PTFE tube with a high quality Capricorn tube. In any case, even with the stock printer you can get excellent results: pieces ready to be painted and placed on your game table!
An excellent investment for all budgets
I suppose you are reading the review because you are intrigued by the potential of 3D printing applied to board games, or in any case because you are considering the purchase of a filament printer. Based on my experience, I can only recommend it. Especially if it is your first printer, and you want to make a “small” investment without passing out!
Thanks to the recent motherboard upgrade (source 🙂 the Geeetech A20 is a great printer to start with. It might give you some headaches if you’re completely new to 3D printing, but be aware that a few tutorials will be enough to start printing like dragons. If you also have an additional 20 euro budget, give yourself another gift and buy the “3d TOUCH” this: to make your life even easier. You can find it both on Amazon.it and on the Geeetech website.
Once purchased, I suggest you take a tour on the various facebook groups of the community, you will find many useful resources and (usually) other enthusiasts willing to help you to optimize your prints.
Geeetech A10/A20/A30 Printer User Group: https://www.facebook.com/groups/206519003304580
Geeetech 3D Printer User Club: https://www.facebook.com/groups/315127105604393
Do not be scared if you see users complaining about some printing problems: as I said before, ALL 3D printers gradually need some basic maintenance, cleaning and eventually the replacement of some worn components (e.g. nozzles / nozzle). One of the winning features of the printers derived from the Prusa i3 is the possibility of finding original spare parts at the cost of a handful of euros, both on Amazon, eBay and on the manufacturer’s website!
Conclusions

After about 100 hours of 3D printing I can say that I really like the A20. I really appreciate the cleanliness of the integrated electronic base and I also liked the ease of assembly and maintenance. Like any printer, however, be aware that you need to spend some time adjusting the print profiles. However, once set up, you will have in your hands a “tractor” ready to meet all your printing needs. In particular, if you want to buy your first printer, I recommend the review printer – an excellent compromise between initial investment, ease of use and maintenance over time. In case you want clarification on my press profiles, write it in the comments and I’ll try to let you have them.
You can buy the printer directly on Amazon.it, using the following link and discount code worth € 80:
Geeetech A20 : https://amzn.to/3bK3QaZ
Discount code for STARFIGHTERS ITALIA readers (value € 80): YAHV8AJ5
(NB: The Code is valid from the publication of this video until October 31, 2020. If you are watching this video and the code has expired, don’t worry: send us an email to info@starfightersitalia.com and we will help you get a new one. however, we do not guarantee functionality indefinitely.)
Useful Tutorials
Let’s put it this way: also thanks to the work I do in everyday life, I’m not really fasting on 3D printing. If you don’t know where to start, I suggest you watch these videos made by industry experts that will allow you to look out over the world of 3D printers …. and revolutionize your gaming tables!
And at the end of the article, you can find my “Work in Progress” print profiles that I am optimizing for the Geeetech A20! The first is dedicated to scenic elements, the second to miniatures. The third profile is dedicated to accessories: this profile is characterized by a higher print speed and lower quality than the other two, but will allow you to obtain excellent, robust and practical prints for your accessories.
Print profiles
Scenics (nozzle 0.4 mm)
Miniatures (nozzle 0.4 mm)
Accessories and generic prints (nozzle 0.4 mm)
One note: the first two profiles will print VERY SLOWLY. Don’t be surprised if it takes 4-5 hours for a medium-sized scenic element and up to 20 hours for large scenery such as bunkers or building parts that take up the entire print bed. To print thumbnails, you might consider installing a 0.2mm nozzle.
The models I printed
The models you see in the video and in the photos are printed in gray PLA and transparent PLA, also by Geeetech. I used Cura 4.6.1 (but version 4.7.1 is already available!) As a slicer to get the gcode files to feed to the printer. I realize that the transparent filament is a bit “harder” to see the details, but I’m building a table for Legion with a lot of “neutral” elements waiting to paint them. And which filament is better than the clear one for this purpose?
Free Slicing SoftwareUltimaker Cura
- Energy generator: https://www.thingiverse.com/thing:2859235
- Moisture Farm: https://www.thingiverse.com/thing:2856961
- Razor Crest: https://www.thingiverse.com/thing:3994663
- The Mandalorian: https://www.thingiverse.com/thing:3989757
- X-Wing maneuver Holder: https://www.thingiverse.com/thing:1421381
- Organizer for Outer Rim: https://www.thingiverse.com/thing:3798412/files
- Charachter markers for Outer Rim: https://www.thingiverse.com/thing:3724664
- Brush holder “Cubistand Mini” – è un mio progetto!: https://www.thingiverse.com/thing:4577544
- X-Wing bases – my own design!: https://www.thingiverse.com/thing:4244692
- Converter for Painting Handle Citadel Miniatures – my own design!: https://www.thingiverse.com/thing:4242697